The Latest Framing Workshops Schedule and the Next Course is Cambridge!
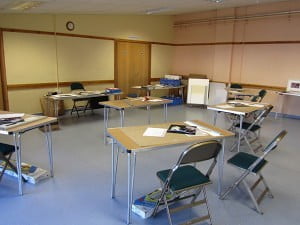
 ere fun, pretty focused work for the weekends and all those attending went away with great pieces. This is the room in in Hurstpierpoint near Brighton, set up and ready for a small group for the mount cutting day.I think people are generally surprised at how much is involved in framing a piece of art. They’re almost always surprised and delighted at the results and amazed at how it’s a pretty busy two days and yet they do leave with a selection of pieces.
After a recent courses, a participant wrote to me with the following:“Dear Sue
ere fun, pretty focused work for the weekends and all those attending went away with great pieces. This is the room in in Hurstpierpoint near Brighton, set up and ready for a small group for the mount cutting day.I think people are generally surprised at how much is involved in framing a piece of art. They’re almost always surprised and delighted at the results and amazed at how it’s a pretty busy two days and yet they do leave with a selection of pieces.
After a recent courses, a participant wrote to me with the following:“Dear SueFraming Your Photographs – Take Control of the Aperture
Last weekend I was teaching the Basics of Framing and Mount Decoration in Devon near Exeter – this was the view from my “classroom” in the village hall, so even though we were inside all weekend, the outlook was inspiring, peaceful and perfect for reviving a city soul!
Framing and Choices
When we do the Basics of Framing, we ask the students to bring along an image no bigger than an A4 page. This means that they have a reasonable size piece of artwork to work with, nether too big nor too small, and the glass, cutting equipment and other stock we bring is all suitable. Typically the class is made up of a mix of photographers and artists, and so the range of media varies, providing a lot of interest.
There is much to consider when framing your art including, quite obviously, the frame itself and the mount board. The range of choice available in these alone can leave you baffled for some time, so for the introductory course we do away with choice, and stick to teaching the basics. Even so there are decisions to be made, and the one I’m interested in today is the aperture.
Managing the Aperture
The aperture is that part of the image that you’ll see once you have framed the picture. You may think that you want to see all of the picture and for the most part this is true, but you still need to have a small amount of the image under the mount, so that it doesn’t fall through the aperture. Generally we recommend you measure 5mm less than the image to establish the aperture size.
Here’s where it’s interesting… if you take a standard size photograph or image to buy a standard size frame, you don’t get much flexibility on what you want to show or hide. When you’re making your own frames, you have complete control. What’s to stop you creating a square aperture for an A4 size image?
Think outside the box and never cut the artwork!
What should you do if the image is skew or too big? The important thing is that you should never cut the artwork. I advise this even if it’s your own and it’s a photograph that you can get reprinted. It’s a good habit to get into. This question regularly comes up in class and students are keen to trim off the bits they don’t like. This past weekend one of my students had a fab black and white photograph, with a few bits he wasn’t so keen on and having settled on an aperture, wanted to know if he could cut off the rest. We looked at the depth of the border and I showed him that by playing with the aperture size he could hide some of the image he felt was distracting without having to trim anything. By keeping it intact, he was able to change his mind about what he wanted to expose and finally settled on a square aperture with a wide border and the result was a much more powerful piece of work.
So don’t be limited by what you can get off the shelf, play with the space and image, and then make a frame to fit the results.
Teaching Again… The Basics of Framing
Last weekend I headed off to High Wycombe to pick up the DIY Framing van with all the materials and equipment I needed to teach two framing courses; The Basic of Framing and Mount Cutting and Decoration. So many firsts! I hadn’t run either of these classes solo before and it had been some time since I last drove this kind of vehicle. Ridiculously I was more concerned about driving the vehicle – M25, Friday afternoon traffic, finding my way and all that – than I was about teaching and managing the flow of teaching a Basics of Framing course. It was good, I enjoyed the drive and made my way down to Hurstpierpoint, near Brighton to be ready to set up and teach on Saturday.
The two courses are offered by DIY Framing as a bundle for Photographers and Artists and can be taken separately or together. In this instance I had 8 students for the basics and 3 for the mount cutting. The great thing about doing the two together is that you get to practice what you learn on day one quite a bit on day 2 and so by the end of the weekend, those who’d completed both days were much more comfortable with the tools ands seem to leave more confident they’d be able to get started when they got home.
It’s a great weekend, on day one you do all the steps required to build a frame from scratch, from measuring the art, cutting the mount, moulding and glass, and assembling the frame. It’s very satisfying to leave the class with a completed project, ready to hang on the wall. Admittedly it’s a long day, made easier because it’s very interactive and the class seem to enjoy the progress made and all enjoyed the final results.
The second day focuses on cutting mounts. We discuss the impact of colour and dimensions and look at the impact mounts can have on a piece of art. Once again, it’s astonishing to see the impact a simple mount can have on a piece of art and the class all loved this. They left on Sunday with a collection of mounted pieces they were delighted with.
I left, shattered and pleased that not too much blood was spilt! Given that we cut glass, use saws and other sharp instruments, this is a real possibility.
Back home and I’ve started to review some of the art we have on display. My next project is to frame a few photographs I’ve had enlarged. I have also been given a couple of shirts to frame. These take quite a lot of work and so I may talk you though that at some point. More on the latest projects next time.
River Crane Framing – A New Beginning – Framing and Training
Another beginning? How many new starts are reasonable? Actually I have found starting again is a challenge. Having enjoyed a successful career in computer technology to switch to something as different as framing pictures has not been as straight-forward as one might think. The challenge in starting again is that it’s effectively starting at the bottom of the ladder again, building skills, establishing a customer base and finding a place to work.
Why framing? Throughout my years working in the computer technology, the pervasive thread has been teaching, which I have always loved; the physical activity of working with and teaching a group of people is both exhausting and enjoyable. As a qualified school teacher I taught Mathematics to senior school students, in the commercial sector, working in IT, I taught a variety of subjects to adults from all walks of life and in New Delhi, India, I taught English to children who ages ranged from 5 to 11 years. I’m not sure which was the most challenging – possibly those 5-year olds with their unstoppable energy!
Another thread that has run through my life has been my “art”. I’ve done all manner of hand-craft to bring a balance into a life full of technology, including woodwork and photography and even reached the point of selling my photography, with a view to moving into doing that full-time. In a world where every piece of technology has an integrated camera, it’s a hard sell! Around the time, when I was selling my photographs, cards and miniature desk calendars at craft fairs, I started framing my photographs, and loved the act of framing as much as I found joy in taking the photographs – so much more satisfying than the selling.
In the years that followed I framed the occasional print and settled back into earning money in the safety of the tech world. In 2012, I started working with wood in earnest again and enjoyed a basic woodwork course and got out the old framing tools, and made a serious effort at turning my shed into a workshop! In the past I had turned the kitchen into a temporary workshop to frame a piece. Having a dedicated space to work meant that I could frame late into the evening without impacting dinner. Throughout the year I framed for friends and gathered others by word-of-mouth. I have enjoyed working with an artists, creating bespoke frames, by matching colours and finishes to bring out the best in the art, photographers and few friends who have dusted down old prints and photographs to hang on their walls. I plan to continue framing this year, and I’ll also be teaching basic framing skills for DIY Framing, on the occasional weekend in the year. See the DIY Framing – UK School of Framing website for details.
River Crane Framing is named to reflect the area where I live and frame, where I walk with friends and the dogs and see the seasons change. If you have something small or large, a photograph, a painting or postcard that you’d like to have framed, have the personal touch, call me.


